

Most of the recipes in this book begin with a sweet cream base we call Walt’s Dream. We recommend perfecting this simple recipe first before moving on to the more elaborate pretzel-, popcorn-, or marshmallow-infused ones. In addition, there are a few basic techniques that you’ll need to master.
Steeping
This is one of the key techniques for imparting flavor to ice cream. Steeping ingredients, or soaking them in the base used to make the ice cream, opens up a whole new world of flavor possibilities. You aren’t limited to a vanilla or chocolate base—you can make rye bread–infused ice cream, popcorn-infused ice cream, or even Cheetos-infused ice cream. The key to steeping is to heat the milk first, until it starts to steam. Then remove the pan from the heat, add the ingredient to be steeped, and cover the pan with a tightfitting lid. Let sit at least 20 minutes. Stir occasionally. The longer you steep, the more concentrated the flavor will become. Our recipes specify the recommended steeping time, which varies according to ingredient and the desired intensity of the flavor.
Tempering Egg Yolks
Tempering egg yolks is an important technique for creating the right creamy consistency in ice cream. You don’t want to dump raw egg yolks into a pot of hundredplus-degree milk, cream, and sugar, because the yolks will cook and form clumps. Start with your egg yolks in a medium bowl and your milk mixture heating on the stove. When the milk mixture reaches 100F to 110F, remove the mixture from the heat. Ladle out about ½ cup and, while whisking, slowly pour this into the egg yolks to temper them. Once the egg-yolk mixture is an even color and consistency, whisk it back into the pan with the remaining milk mixture and continue to gradually heat it. Just in case any clumps have formed, were commend straining your mix through a wire-mesh strainer before churning.
Ice Bath
We cook (or pasteurize) our ice cream base in order to kill as many microorganisms as possible, making the ice cream safe to eat. But if we don’t cool our cooked base quickly—if we take the 165F base and stick it in the refrigerator, for example—the time it takes for the temperature to fall back to 40F to 45F allows for those microorganisms to multiply again. That’s why we use an ice bath to rapidly cool the base. The easiest place to create an ice bath is in your kitchen sink. Fill the sink a quarter of the way with cold water and add a few handfuls of ice. Then gently lower the ice cream base into the ice bath. Let cool for 15 to 20 minutes, stirring occasionally. Make sure your base has cooled completely before churning.
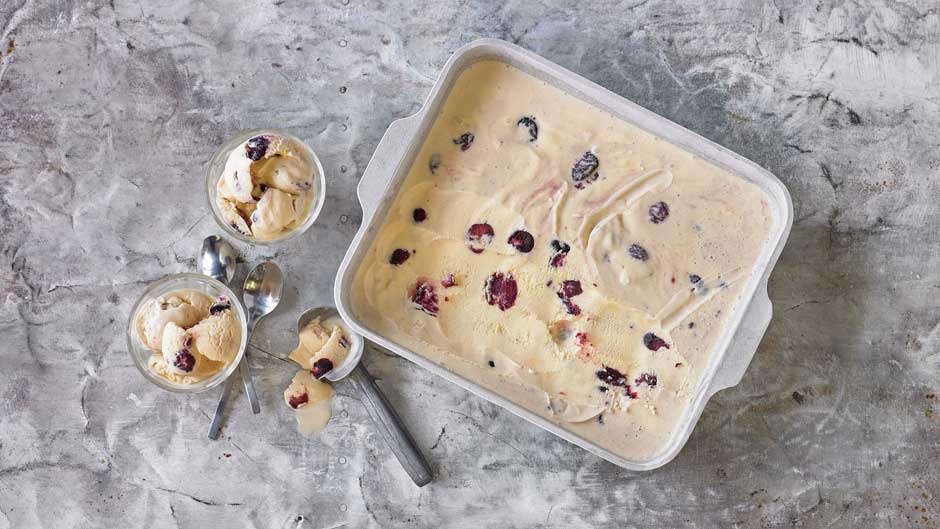
Adding Swirls and Mix-ins
Nearly all swirls and mix-ins are added after the ice cream has been churned. Otherwise, swirls would simply blend into the ice cream as it churns, and mix-ins would sink to the bottom. When the ice cream has finished churning, get a freezer-proof plastic storage container. This is the time to add swirls and mix-ins. For swirls, transfer two scoops of ice cream to the storage container, then drizzle (or spoon) the chocolate (or jam or peanut butter) over the ice cream. Be careful not to overmix it into the ice cream. Repeat with two more scoops of ice cream, more drizzle, and so on, until all of the ice cream has been added to the storage container and mixed with the swirl. Move quickly or the ice cream will melt. Mix-ins are easier. Just stir them in as you transfer the ice cream to the storage container. Use as little or as much as you’d like. Our goal in the shop is to go overboard with mix-ins, but perhaps you prefer a lighter hand. It’s up to you. All the recipes for mixins make approximately one tray, but that it is more than necessary for the recipe of ice cream. Enjoy the leftovers!
Facts and Figures
- All of the recipes yield approximately 1 quart of ice cream.
- One quart of ice cream should serve about 8 people, or make 8 half-cup servings.
- All of the recipes will keep for up to 1 week (or so). After about a week, homemade ice cream will begin to form ice crystals and will lose its creamy, smooth texture.
- The recipes take 30 minutes or more to complete.
- In a hand-crank ice cream maker, it should take about 30 minutes to churn Walt’s Dream.
- Make sure the mix is completely cool before churning.
- If you prefer super-creamy, soft-serve-style ice cream, feel free to serve it directly from your ice cream maker. If you want your ice cream to be more solid and scoopable—and you have some patience—we recommend freezing overnight, or until the ice cream is completely solid, which will take 8 to 12 hours.
Ingredients
- 3/4 cup organic cane sugar
- 1/2 cup skim milk powder
- 1 2/3 cup whole milk
- 1 2/3 cup heavy cream
- 3 egg yolks
Instructions
- Prepare an ice bath in your sink or in a large heatproof bowl.
- In a medium saucepan, combine the sugar, skim milk powder, and milk. Stir with a hand mixer or whisk until smooth. Make sure the skim milk powder is wholly dissolved into the mixture and that no lumps remain (any remaining sugar granules will dissolve over the heat). Stir in the cream.
- Clip a candy thermometer to the saucepan and set the pan over medium heat. Cook, stirring often with a rubber spatula and scraping the bottom of the pan to prevent sticking and burning, until the mixture reaches 110F, 5 to 10 minutes. Remove the pan from the heat.
- Place the egg yolks in a medium bowl. While whisking, slowly pour in ½ cup of the hot milk mixture to temper the egg yolks. Continue to whisk slowly until the mixture is an even color and consistency, then whisk the egg-yolk mixture back into the remaining milk mixture.
- Return the pan to the stovetop over medium heat and continue cooking the mixture, stirring often, until it reaches 165F, 5 to 10 minutes more.
- Transfer the pan to the prepared ice bath and let cool for 15 to 20 minutes, stirring occasionally. Pour the ice cream base through a wire-mesh strainer into a storage container and place in the refrigerator for 1 to 2 hours, or until completely cool.
- Now you’re ready to make ice cream! Transfer the cooled base to an ice cream maker and churn it according to the manufacturer’s instructions. Or, if you want, you can keep it in the refrigerator for up to 3 days before churning.
- After churning, serve immediately or harden in your freezer for 8 to 12 hours for a more scoopable ice cream.